
This tutorial explains how to use I2C LCD on Arduino.
1. Introduction
This tutorial explains how to use I2C LCD on Arduino. This tutorial is helpful in using I2C backpack available for LCD.

2. Connections:
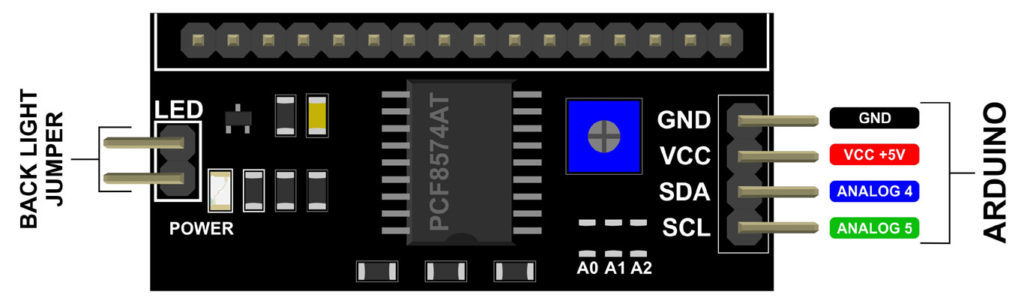
Mount LCD on the i2c LCD backpack as shown above. Then make the following connections with Arduino Board. The potentiometer on the LCD backpack is to adjust LCD contrast.

Before we go ahead we will need to know the i2c address of our backpack, if you don’t know the same use following step to know.
3. I2C Scanner
Download and upload the following code to your Arduino, after uploading open serial monitor and you will find the address of attached i2c devices.
You may download i2c scanner Arduino sketch from here.
// Ref- Nick Gammon  http://www.gammon.com.au/forum/?id=10896
// I2C Scanner

#include <Wire.h>

void setup() {
  Serial.begin (9600);
  while (!Serial) // Waiting for serial connection
    {
    }

  Serial.println ();
  Serial.println ("I2C scanner. Scanning ...");
  byte count = 0;

  Wire.begin();
  for (byte i = 8; i < 120; i++)
  {
    Wire.beginTransmission (i);
    if (Wire.endTransmission () == 0)
      {
      Serial.print ("Found address: ");
      Serial.print (i, DEC);
      Serial.print (" (0x");
      Serial.print (i, HEX);
      Serial.println (")");
      count++;
      delay (1);  // maybe unneeded?
      } // end of good response
  } // end of for loop
  Serial.println ("Done.");
  Serial.print ("Found ");
  Serial.print (count, DEC);
  Serial.println (" device(s).");
}  // end of setup

void loop() {}
the output of this sketch will be as shown below, theI2C address is highlighted. I2C address of our LCD backpack is 0x3F.

4. Serial LCD library –
Download Here – LiquidCrystal
Download the library and extract. You will need to install this library to your Arduino. Following are the steps to install this library.
4.1. Go the following location –
C:\Program Files (x86)\Arduino\libraries
or
C:\Program Files\Arduino\libraries
or
The installation folder of Arduino. You may get it by- Right click on Arduino icon->properties->location
or
for Linux and Mac users find the same from install folder of Arduino.
4.2. Find “LiquidCrystal” folder Cut this folder and Paste at some other place (by doing this you will create backup of Arduino’s original LiquidCrystal library.)
4.3. Copy and paste the extracted folder at step 1.2. i.e. “LiquidCrystal” at Arduino Library Folder. In other words it can be understood that you are to replace Arduino’s LiquidCrystal library by the downloaded one from here.
3. Hello World Sketch of I2C LCD.
Upload the following code to your Arduino.
You may download this code(sketch) from here.
#include <Wire.h>
#include <LiquidCrystal_I2C.h>

LiquidCrystal_I2C lcd(0x3F, 2, 1, 0, 4, 5, 6, 7, 3, POSITIVE);  // SET I2C Address

void setup() {

  lcd.begin(16,2);  // Initialinze LCD.
  lcd.backlight(); // makes Backligh ON.
  lcd.clear();     // Clears LCD
  lcd.home();      // Sets cursor at Column 0 and Line 0
  lcd.print("Hello, world!");
  lcd.setCursor(0,1); // Sets cursor at Column 0 and Line 1
  lcd.print("Robo India");
}


void loop()
{
  // include your code.
}
You will need to make sure that you have mentioned correct I2C address in the sketch as highlighted in the following image.

If you have any query please write us at support@roboindia.com
Thanks and Regards
Content Development Team
Robo India
http://roboindia.com