
This tutorial of Robo India is a basic tutorial to connect Arduino Uno with the GT-521F32 includes an optical sensor for reading fingerprints and a processing IC with built-in fingerprint algorithms.
1. Introduction:
This tutorial explains how to connect a Aduino Uno with the GT-521F32 Here you will find information about connecting the fingerprint scanner and how to use it with Hawley’s FPS_GT511C3 library.
2. Hardware required
| S.No. | Item | Quantity |
| 1 | Arduino Uno | 1 |
| 2 | Fingerprint Scanner TTL (GT 521F32) | 1 |
| 3 | Breadboard | 1 |
| 4 | Logic Level Converter | 1 |
| 5 | FTDI | 1 |

3. Connections:
1. Connection with FTDI:
| Fingerprint Scanner | FTDI 3.3V |
| RX | TX |
| TX | RX |
| 3.3V | 3.3V |
| GND | GND |
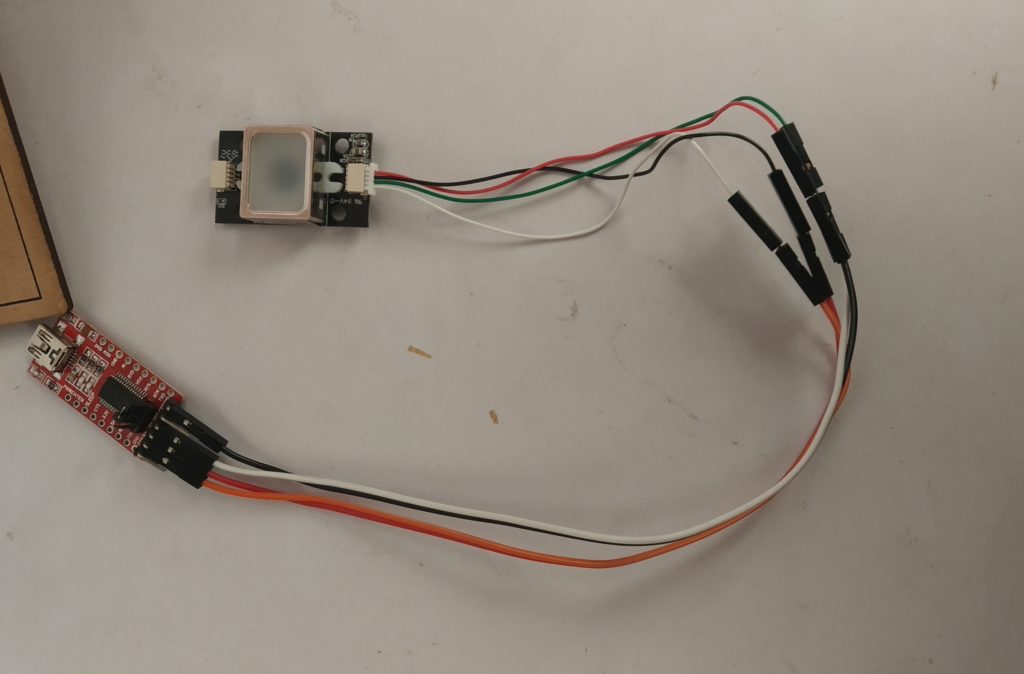
Demo Software with a 3.3V FTDI :
After making the connections with the 3.3V FTDI , connect the USB cable with computer and install all the drivers of FTDI .
Note the COM port of FTDI and update the driver by right clicking on USB COM port :

Opening and Connecting to the SDK_Demo.exe
- Download the Demo software development kit (SDK) given below.
SDK Demo software
- Unzip the folder.
- Go ….\20171129-SDK_Demo_Ver1.9.zip\20171129-SDK Demo Ver1.9\Release
- Open SDK_DEMO.exe executable file.
- Select the COM Port of FTDI in the Serial Port Number’s drop down list .
- Select 9600 Baudrate’s drop down list.
- Click on Open Button.

The COM Port should range between “COM3” to “COM10”, if your USB Port shows number higher than that, then force down the COM Port to lower number in computer’s device manager.
Enrolling
To enroll the fingerprint you need to enroll finger three times for each ID.
- Select an ID with no fingerprint template by adjusting the ID field.
- Press the Enroll button. Result: “to input finger1!”
- Place a finger on the FPS. Result: “Processing Fingerprint…”
- Place and remove your finger as asked by FPS until a successfull attempt occur.
- After successful enrolling of fingerprint the result will show as “Enroll Ok (ID=0)!” .

Identifying
The SDK_DEMO.exe provides the facility of both verifying and identifying the fingerprint.
- After enrolling the finger to check whether the fingerprint can be identified, click on Identify(1:N) .
- After pressing the finger against FPS the SDK_DEMO.exe will check through the local database to see if it can recognize fingerprint against the saved fingerprint templates.


- To test and verify, click on Verify(1:1).
2. Connection with Arduino:
It is recommended to use a bi-directional LLC , if we are using a 5V Arduino microcontroller.
| Fingerprint Scanner | Logic Level Converter (Low Side) | Logic Level Converter (High Side) | 5V Arduino |
| Tx | LV1 | HV2 | Pin 11 |
| Rx | LV2 | HV1 | Pin 10 |
| GND | GND | GND | GND |
| Vin | LV | HV | 5v |
After wiring the circuit up, it should look like this:

2.1 coding
Enrolling
The FPS_Enroll. is used for enrolling a fingerprint each time the Arduino is reset. The fingerprint will save in a template within the scanner’s local database. The code will initialize like the FPS_Blink.ino sketch. Instead of toggling the LED, the LED will remain on to scan a fingerprint. Before the end of the setup() function, it will jump to the Enroll()function. The Enroll() function will look for an empty template ID and begin enrolling your fingerprint.
Below is what to expect in the serial monitor when enrolling a finger successfully:
you may download code from here.
#include "FPS_GT511C3.h"
#include "SoftwareSerial.h"

// set up software serial pins for Arduino's w/ Atmega328P's
// FPS (TX) is connected to pin 4 (Arduino's Software RX)
// FPS (RX) is connected through a converter to pin 5 (Arduino's Software TX)
//FPS_GT511C3 fps(4, 5); // (Arduino SS_RX = pin 4, Arduino SS_TX = pin 5)

/*If using another Arduino microcontroller, try commenting out line 59 and
uncommenting line 68 due to the limitations listed in the
library's note => https://www.arduino.cc/en/Reference/softwareSerial . Do
not forget to rewire the connection to the Arduino*/


// FPS (TX) is connected to pin 10 (Arduino's Software RX)
// FPS (RX) is connected through a converter to pin 11 (Arduino's Software TX)
FPS_GT511C3 FPS(10, 11); // (Arduino SS_RX = pin 10, Arduino SS_TX = pin 11)

void setup()
{
  Serial.begin(9600); //set up Arduino's hardware serial UART
  delay(100);
  FPS.Open();         //send serial command to initialize fps
  FPS.SetLED(true);   //turn on LED so fps can see fingerprint

  Enroll();          //begin enrolling fingerprint
}

void Enroll()
{
  // Enroll test

  // find open enroll id
  int enrollid = 0;
  bool usedid = true;
  while (usedid == true)
  {
    usedid = FPS.CheckEnrolled(enrollid);
    if (usedid==true) enrollid++;
  }
  FPS.EnrollStart(enrollid);

  // enroll
  Serial.print("Press finger to Enroll : ");
  Serial.println(enrollid);
  while(FPS.IsPressFinger() == false) delay(100);
  bool bret = FPS.CaptureFinger(true);
  int iret = 0;
  if (bret != false)
  {
    Serial.println("Remove finger");
    FPS.Enroll1();
    while(FPS.IsPressFinger() == true) delay(100);
    Serial.println("Press same finger again");
    while(FPS.IsPressFinger() == false) delay(100);
    bret = FPS.CaptureFinger(true);
    if (bret != false)
    {
      Serial.println("Remove finger");
      FPS.Enroll2();
      while(FPS.IsPressFinger() == true) delay(100);
      Serial.println("Press same finger yet again");
      while(FPS.IsPressFinger() == false) delay(100);
      bret = FPS.CaptureFinger(true);
      if (bret != false)
      {
        Serial.println("Remove finger");
        iret = FPS.Enroll3();
        if (iret == 0)
        {
          Serial.println("Enrolling Successful");
        }
        else
        {
          Serial.print("Enrolling Failed with error code:");
          Serial.println(iret);
        }
      }
     else Serial.println("Failed to capture third finger");
    }
    else Serial.println("Failed to capture second finger");
  }
  else Serial.println("Failed to capture first finger");
}


void loop()
{
  delay(10000);
}
Below is output in the serial monitor when enrolling a finger successfully:

Identifying
The FPS_Identify sketch checks to see if a finger is on the scanner. Once a finger has been placed on the scanner, it checks the fingerprint against any of the fingerprints saved in the local database. You will be notified through the serial monitor if the fingerprint matches an ID, if the fingerprint is not found, or when it fails to read the fingerprint. After checking and lifting your finger, it will request for another fingerprint to check.
you may download code from here.
#include "FPS_GT511C3.h"
#include "SoftwareSerial.h"

// set up software serial pins for Arduino's w/ Atmega328P's
// FPS (TX) is connected to pin 4 (Arduino's Software RX)
// FPS (RX) is connected through a converter to pin 5 (Arduino's Software TX)
//FPS_GT511C3 fps(4, 5); // (Arduino SS_RX = pin 4, Arduino SS_TX = pin 5)

/*If using another Arduino microcontroller, try commenting out line 53 and
uncommenting line 62 due to the limitations listed in the
library's note => https://www.arduino.cc/en/Reference/softwareSerial . Do
not forget to rewire the connection to the Arduino*/

// FPS (TX) is connected to pin 10 (Arduino's Software RX)
// FPS (RX) is connected through a converter to pin 11 (Arduino's Software TX)
FPS_GT511C3 fps(10, 11); // (Arduino SS_RX = pin 10, Arduino SS_TX = pin 11)

void setup()
{
  Serial.begin(9600); //set up Arduino's hardware serial UART
  delay(100);
  fps.Open();         //send serial command to initialize fps
  fps.SetLED(true);   //turn on LED so fps can see fingerprint
}

void loop()
{
  // Identify fingerprint test
  if (fps.IsPressFinger())
  {
    fps.CaptureFinger(false);
    int id = fps.Identify1_N();


               // GT-521F32 can hold 200 fingerprint templates

    if (id <200) //<- change id value depending model you are using
       {//if the fingerprint matches, provide the matching template ID
        Serial.print("Verified ID:");
        Serial.println(id);
       }
    else
       {//if unable to recognize
       Serial.println("Finger not found");
       }
  }
  else
  {
    Serial.println("Please press finger");
  }
  delay(1000);
}
Below is output in the serial monitor when identify a finger successfully:

Buy this kit on Amazon:
Buy this kit on Robo India: click here
If you have any query please write us at support@roboindia.com
Thanks and Regards
Content Development Team
Robo India
https://roboindia.com